PVE基础操作之:完成装机后的优化/初始化设置
前言
pve系统的装机没什么难度,和普通debian装机没什么区别,按照默认设置一路下一步就行了,就算有不懂的地方网上也有一大堆教程。
pve装完系统之后就可以登陆webui了,到这一步还有许多设置需要优化,或者叫初始化:
- 删除local-lvm分区
- 换源
- 关闭订阅弹窗提醒
很多次装完pve以后我都要上网找教程,所以自己写篇博客做个记录。
删除local-lvm分区
pve装完系统以后默认会有一个local分区和一个local-lvm分区,默认这俩分区各司其职,比如local用来存镜像文件(iso)、local-lvm用来存磁盘镜像,但这样的结果就是本意是好的,但实际体验反而很不好,比如导致一个分区不够用但另一个分区空荡荡。所以第一步就是删除local-lvm分区。操作分成三步:
第一步:在webui上通过shell访问pve,然后输入以下命令
# 删除分区
lvremove /dev/pve/data

# 提示是否删除,敲y
Do you really want to remove active logical volume pve/data? [y/n]: y

# 重新分配空间
lvextend -rl +100%FREE /dev/pve/root
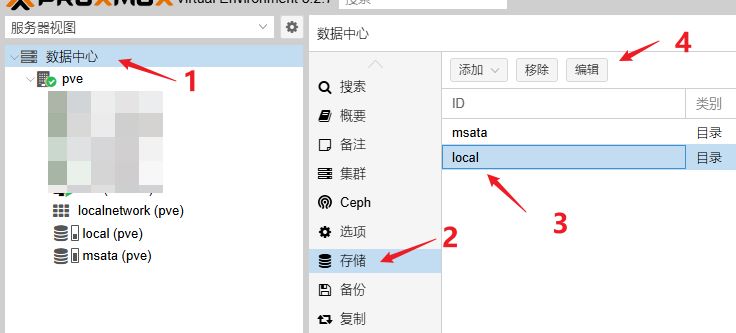
第二步:在webui中删除local-lvm分区

- 网图,我的pve系统这个分区已经删除了,所有这里借用alay.cc的图片
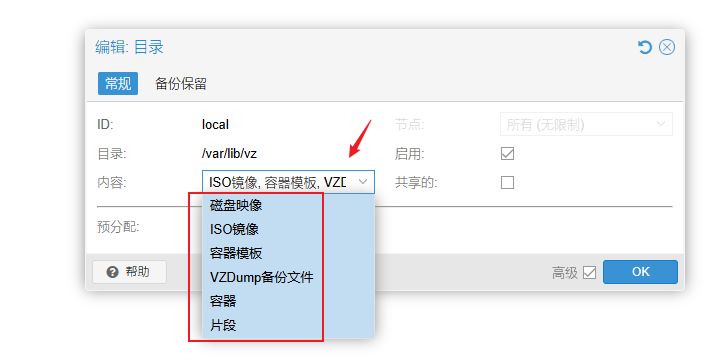
第三步:调整local分区的用途
如果你的pve只有一个local分区(或者叫local目录),默认这个分区是不能存放磁盘镜像(也就是虚拟机要用到虚拟磁盘)的,在删除local-lvm分区以后,需要把这个功能添加到local分区。

在内容一栏中,把所有功能都加上即可。

到此就完成了分区空间的合并。
换源
pve默认源是proxmox收费源,不订阅的话无法更新,所以需要更换其它的免费源。
pve需要替换的源一共有三个:
- debian
- proxmox ve
- ceph
第一步:debian换源。
依然是webui界面通过shell访问pve主机
# 编辑debian源的文件
nano /etc/apt/sources.list
将默认的内容全部注释
#deb http://ftp.debian.org/debian bookworm main contrib

#deb http://ftp.debian.org/debian bookworm-updates main contrib

# security updates
#deb http://security.debian.org bookworm-security main contrib
然后粘贴国内的源,我这里选择用清华的源
# 默认注释了源码镜像以提高 apt update 速度,如有需要可自行取消注释
deb https://mirrors.tuna.tsinghua.edu.cn/debian/ bookworm main contrib non-free non-free-firmware
# deb-src https://mirrors.tuna.tsinghua.edu.cn/debian/ bookworm main contrib non-free non-free-firmware

deb https://mirrors.tuna.tsinghua.edu.cn/debian/ bookworm-updates main contrib non-free non-free-firmware
# deb-src https://mirrors.tuna.tsinghua.edu.cn/debian/ bookworm-updates main contrib non-free non-free-firmware

deb https://mirrors.tuna.tsinghua.edu.cn/debian/ bookworm-backports main contrib non-free non-free-firmware
# deb-src https://mirrors.tuna.tsinghua.edu.cn/debian/ bookworm-backports main contrib non-free non-free-firmware

# 以下安全更新软件源包含了官方源与镜像站配置,如有需要可自行修改注释切换
deb https://mirrors.tuna.tsinghua.edu.cn/debian-security bookworm-security main contrib non-free non-free-firmware
# deb-src https://mirrors.tuna.tsinghua.edu.cn/debian-security bookworm-security main contrib non-free non-free-firmware
最后保存即可,到此完成了debian换源。
第二步:pve换源
在webui界面通过shell访问pve主机
pve的默认源配置文件是/etc/apt/sources.list.d/pve-enterprise.list,可以将这个文件直接删除,或者将文件内容注释。
然后在/etc/apt/sources.list.d目录下新建pve-no-subscription.list文件,在文件中添加内容
deb https://mirrors.tuna.tsinghua.edu.cn/proxmox/debian/pve bookworm pve-no-subscription
最后保存文件,到此完成pve换源。
第三步:ceph换源
这一步可以根据自己是否会用到ceph来决定是否要换源,我因为用不到ceph,所以跳过了这一步。
换源操作直接抄录清华镜像站的文档内容
请参考Ceph 官方安装教程,只需要把文档中出现的 download.ceph.com 替换为以下链接即可。

https://mirrors.tuna.tsinghua.edu.cn/ceph
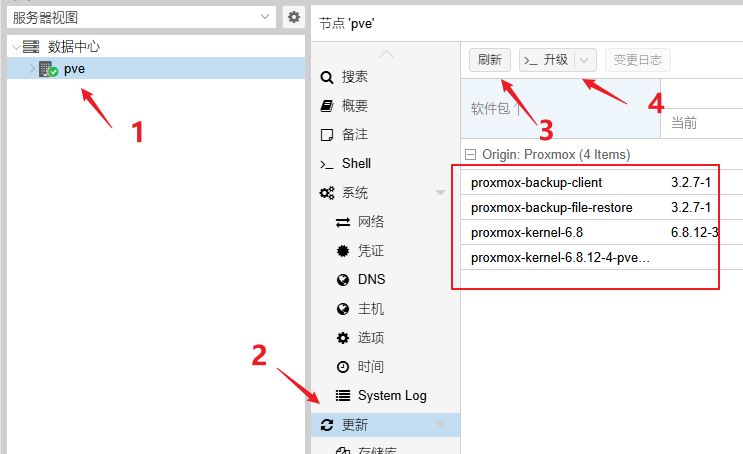
最后一步:更新
pve会有计划任务每天更新软件包数据,所以换源之后不需要自己手动更新。但如果确实想自己手动更新,操作如下图

关闭订阅弹窗
pve的订阅弹窗通过/usr/share/javascript/proxmox-widget-toolkit/proxmoxlib.js中的代码判断,需要手动修改对应的代码片段即可。
在webui界面通过shell访问pve主机
# 用文本编辑器打开js文件
nano /usr/share/javascript/proxmox-widget-toolkit/proxmoxlib.js
定位到560行附近,有如下一段代码
success: function(response, opts) {
	let res = response.result;
	if (res === null || res === undefined || !res || res
		.data.status.toLowerCase() !== 'active') {
	  Ext.Msg.show({
		  title: gettext('No valid subscription'),
		  icon: Ext.Msg.WARNING,
		  message: Proxmox.Utils.getNoSubKeyHtml(res.data.url),
		  buttons: Ext.Msg.OK,
		  callback: function(btn) {
			  if (btn !== 'ok') {
				  return;
			  }
				orig_cmd();
		  },
	  });
	} else {
		orig_cmd();
	}
}
代码逻辑很简单,就是判断res.data.status的值是不是active,如果不是就弹窗。所以只需要手动赋值一个active就行了。
success: function(response, opts) {
	let res = response.result;
	// 这里加上一行
	res.data.status = 'active';
	if (res === null || res === undefined || !res || res
		.data.status.toLowerCase() !== 'active') {
	  Ext.Msg.show({
		  title: gettext('No valid subscription'),
		  icon: Ext.Msg.WARNING,
		  message: Proxmox.Utils.getNoSubKeyHtml(res.data.url),
		  buttons: Ext.Msg.OK,
		  callback: function(btn) {
			  if (btn !== 'ok') {
				  return;
			  }
				orig_cmd();
		  },
	  });
	} else {
		orig_cmd();
	}
}
完成js代码的修改以后,保存文件后退出,然后重启webui使之生效。
systemctl restart pveproxy.service
- tips:如果手动赋值无效,也可以直接注释整段的判断逻辑,保留
orig_cmd()即可。
喝杯奶茶
